[Beta探究] 加密 ESD 的解压
你没听错,现在可以从加密的ESD中提取东西了。先别激动——本文主要针对那些对Windows映像格式(WIM)和没有文档的电子软件下载(ESD)映像格式有一定经验的人!
为防止未经授权的用户安装Windows镜像,微软选择了对部分ESD文件进行加密。加密工具先对原始镜像使用AES加密特定的数据块,然后使用RSA加密AES密钥,并将密钥加密结果及其他信息以XML表的形式保存在ESD文件尾部。在正常使用流程中,客户端先从Windows Update服务器获得ESD文件及RSA私钥,此后由RSA私钥解密AES密钥,再由AES密钥解密那些加密过的文件区段。如果只有ESD文件而没有RSA私钥,ESD就只是一个占地方的废品而已……吗?
加密区段
由于不是所有在产处理器都内置AES支持,基于性能考量,微软选择了只加密了数据提取需要的文件区段,而这些加密的区段对应ESD文件结构中的文件元数据资源、索引查找表以及区块表部分。
对这些数据解密后,你才能获得一个完整的ESD压缩镜像文件: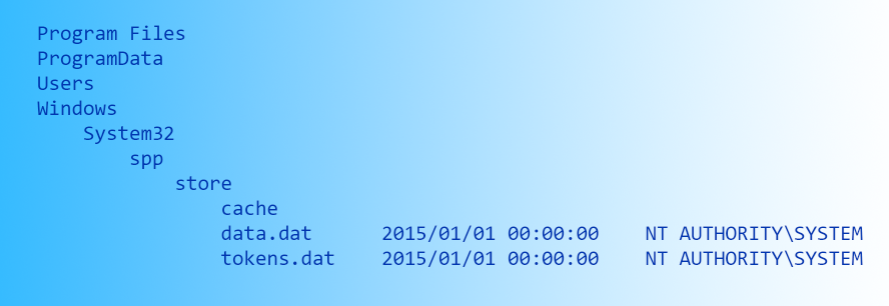
仅有文件查找表和区块表解密时,你能得到缺少目录结构和原始文件名的所有文件,这些文件可以通过SHA1进行鉴定:
如果连查找表也没有,那能得到的就只是整块的一个数据文件,它由所有原始文件拼接而成。你无法知道文件的顺序以及每个文件的起始和结束位置,就只是所有文件数据拼接了起来。
而如果这三个表都保持加密状态,提取数据就无从谈起了。你什么都得不到,甚至连提取出来的数据长度信息都不知道。
破译区块表
基于上述信息,如果我们在无法获得解密密钥的情况下能通过某种方式获得区块表内容,那我们就能至少获得那个由所有文件拼成的整块数据文件。虽然这距离重建Windows镜像还很遥远,但是至少我们已经可以手动提取一些我们感兴趣的内容(比如winre.wim、ntoskrnl.exe、explorer.exe等等)。
而要想破译区块表,我们得首先了解一下区块表是什么。
ESD文件实际上是通过LZMS算法以64MiB区块固实压缩的压缩文件,而要解压LZMS数据块需要以下信息:
- 压缩数据开始位置的偏移量。
- 压缩数据的长度。
- 解压后的数据长度。
这些信息被存储在区块表中,每个固实数据块对应一个区块表,同时每个固实数据块对应着镜像文件内的一个镜像索引。区块表的数据结构如下所示:
typedef struct _WIM_CHUNKED_REGION_HEADER
{
    ULARGE_INTEGER ullUncompressedSize;
    DWORD dwWindowSize;
    DWORD dwCompressionType;
    DWORD dwCompressedSizes[];
} WIM_CHUNKED_REGION_HEADER;
- 第一个字段ullUncompressedSize,64位整型,存放该索引解压后的数据大小。用该值可以计算出该索引对应的区块总数:numChunks =⌈ullUncompressedSize ÷ 64 MiB⌉以及该索引的尾部区块大小:sizeof(tailChunkUncompressed) = ullUncompressedSize – (numChunks – 1) × 64 MiB。非尾部区块的大小恒定为dwWindowSize(64 MiB)。
- 第二个字段dwWindowSize为压缩前的每段数据块大小。对ESD文件总是64MiB。
- 第三个字段dwCompressionType为数据块的压缩类型。对ESD文件总是LZMS (3)。
- 最后一个字段是存放压缩后数据大小的数组,每个大小数据可用于计算下一个压缩块的起始位置。
综上,对于每一个索引,通过区块表可以获得以下信息:
- 索引对应的压缩区块数量。
- 每个压缩区块的起始位置、数据长度以及解压后的数据长度。
由于区块表已被加密,我们无法获得上述任何一点信息。所以现在的问题是,我们如何在没有区块表的情况下获得所有这些信息?或者说,我们只利用压缩数据自身如何做到重建区块表?
首先要确定索引对应的区块数量。此前已经介绍过,在ESD文件中,每个索引对应到一个固实数据块(仅包含此前索引中没有的
新文件),每个数据块又有一份独立的区块表,此外每个索引还有一份元数据资源信息。又已知每个索引区块表和元数据都已被加密,下面我们来分析一份标记被加密数据的XML表: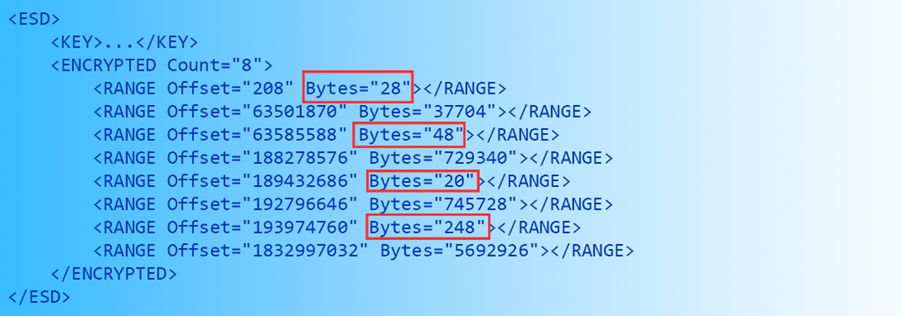
上图中红圈部分长度数值显著小于其他部分,很容易猜到这些内容对应的是每个被加密的区块表长度。
每个固实数据块对应的区块数量可由区块表结构体大小推得:(sizeof(chunkTable) – 16) ÷ 4。以上图中的第一个区块表为例:结构体大小为28,扣除一个64位整型及两个32位整型的16字节,可得dwCompressedSizes数组的最大下标:(28 – 16) ÷ 4 = 3,即第一个数据块对应3个区块。
下一步是确定各个区块的起始位置。每个固实数据块的首个区块起始位置必然是区块表的结束位置+1,故对于1号索引而言,起始位置就是208 + 28 = 236。
确定了起始位置,下一步要确定的是区块压缩后数据大小和解压后数据大小,有了这些我们就能提取数据。由于第一个块并不是一个尾部区块(第一步确认了1号索引共有3个区块),解压后的数据大小显然为64MiB。而压缩数据大小可以通过暴力方式求解。
以下是用于暴力确定压缩数据大小的伪代码:
Function UncompressLZMS(Input, InputLen, Output, OutputLen) Returns Length Throws Exception
Function CompressLZMS(Input, InputLen, Output, OutputCap) Returns Length Throws Exception

Function GetCompressedSize(CompressedBuffer[64 MiB]) Returns Length
    SizeToTry = 1
    UncompressedBuffer = Buffer(64 MiB)
    RecompressedBuffer = Buffer(64 MiB)
    While SizeToTry < 64 MiB:
        Try:
            ULen = UncompressLZMS(CompressedBuffer, SizeToTry, UncompressedBuffer, 64 MiB)
            If ULen != 64 MiB:
                Throw BAD_ULEN
            CLen = CompressLZMS(UncompressedBuffer, 64 MiB, RecompressedBuffer, 64 MiB)
            If CLen != SizeToTry:
                Throw BAD_CLEN
            If RecompressedBuffer != CompressedBuffer
                Throw BUFF_MISMATCH
            Return SizeToTry
        Catch:
            SizeToTry = SizeToTry + 1
    Return 64 MiB // Chunk is uncompressed (can happen in ESDs).
求解出压缩数据块大小后,我们就可以解压这个区块了。将当前压缩区块起始偏移量加上压缩区块大小就是下一个压缩区块的起始偏移量,可用同理解压。由于1号索引共有3个区块,3号区块就到了尾部区块。到了这里情况逐渐变得棘手起来,由于这是尾部数据,压缩前的数据块大概率不能填充压缩窗口,故对于尾部区块而言,压缩前数据大小亦是未知量。幸运的是,这一次压缩后的数据区块大小是已知量。让我们再看看刚才那张XML表: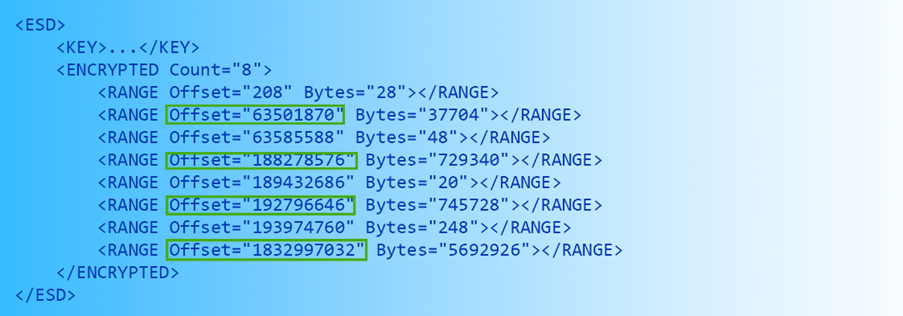
图中绿框部分是被加密的元数据偏移量,又由于元数据紧接着压缩区块部分,我们可以通过元数据起始位置与尾部区块起始位置相减获得尾部区块大小。故仅需暴力求解解压后大小即可。以下是用于暴力确定解压后数据大小的伪代码:
Function UncompressLZMS(Input, InputLen, Output, OutputLen) Returns Length Throws Exception
Function CompressLZMS(Input, InputLen, Output, OutputCap) Returns Length Throws Exception

Function GetUncompressedSize(CompressedBuffer[CompressedSize]) Returns Length
    SizeToTry = 1
    UncompressedBuffer = Buffer(64 MiB)
    RecompressedBuffer = Buffer(64 MiB)
    While SizeToTry <= 64 MiB:
        Try:
            If SizeToTry = CompressedSize:
                Throw SAME_LEN_NOT_ALLOWED
            ULen = UncompressLZMS(CompressedBuffer, CompressedSize, UncompressedBuffer, SizeToTry)
            If ULen != SizeToTry:
                Throw BAD_ULEN
            CLen = CompressLZMS(UncompressedBuffer, SizeToTry, RecompressedBuffer, 64 MiB)
            If CLen != CompressedSize:
                Throw BAD_CLEN
            If RecompressedBuffer != CompressedBuffer
                Throw BUFF_MISMATCH
            Return SizeToTry
        Catch:
            SizeToTry = SizeToTry + 1
    Return CompressedSize // Chunk is uncompressed (can happen in ESDs).
借助尾部数据的这些信息,我们同样可以解压它。至此我们已经获得了单个索引对应的全部区块的解压后数据,将这些数据连接在一起就是索引对应的固实数据块。经过上述过程,我们也获得了重建区块表所需的全部信息(固实数据块大小以及压缩区块大小),可以保存在某处以备后续查验使用。
对恢复文件查找表的尝试
对于多索引的ESD而言,靠前的索引文件查找表是可以被恢复的。多索引ESD文件是通过对此前索引附加内容实现添加索引的。添加索引并不是通过修改原镜像文件尾部的文件查找表和XML数据实现的,DISM/WImgAPI直接在新增的索引后生成了相应数据并修改了头部数据中的指针位置。由于缺少旧的文件查找表和XML数据的相应指针,新增的索引是无法被加密的。而这也让恢复靠前的索引的文件查找表成为可能。让我们最后看一次这张标记被加密数据的XML表: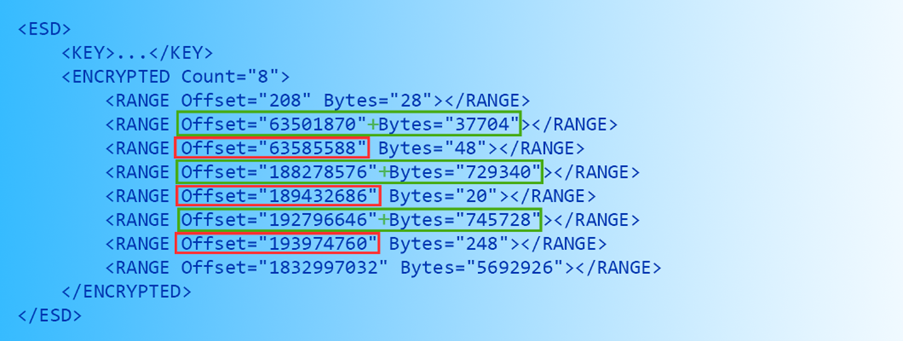
ESD文件在每个元数据资源后面都会附带一份查找表和XML信息(如上图绿框所示),我们可以根据元数据资源及其长度来获得对应的“查找表+XML”起始地址。用下一区块表的起始地址(如上图红框所示)减去“查找表+XML”的起始地址,我们可以得到“查找表+XML”的数据长度。以第一个索引为例,该处无参考数据的查找表起始于63501870 + 37704 = 63539574,其数据长度为63585588 – 63539574 = 46014,即从ESD文件偏移量 63539574开始46014字节长度的数据对应第一个索引的“查找表+XML”数据。查找表数据是非ASCII二进制数据,XML数据是纯文本,所以很容易把二者分别出来(XML部分其实没多大用)。
最后一个可恢复的查找表能够从除最后一个索引外的其他索引中提取所有独立文件。通过检查新的文件入口点以及文件参考计数,每个查找表都可以根据上一个查找表推断出该索引特有的文件。
总结
ESD加密在防止未经授权的用户安装Windows镜像这一方面确实非常有效,但它不能保证数据不被提取。只要有充足的时间并且愿意下功夫,现存的大部分加密ESD中的数据是可以被完全恢复的。
ESD暴力解压工具
包含的工具
- RawUncomp - 用于从截断的LZX WIM中恢复数据的工具。
- LibMSCompress - 围绕私有wimgap.dll函数包装库。
- MSComp - 支持XPRESS、LZX和LZMS的压缩/解压缩工具。
- ESDCrack - 半自动ESD破解工具。
ESD 破解
ESDCrack目前不支持尾部块的解压缩(代码在那里,但我已经禁用了它),因为实际强行执行尾部块需要数年时间。您可以使用附带的MSCompress实用程序的模式3手动破解尾部块,在该模式中,您可以调整参数以显著减少尝试的组合数量。请随时修改/改进这些工具,如果您有更好的方法/算法,请告诉我们!
附言:别嘲笑我的代码,我知道它很糟糕。我不是一个软件开发人员,我从来没有上过一节编程课,所以你期待什么?哈哈。
特别感谢
特别感谢BlueRain提出可以提取加密ESD中的数据的想法,并将本文翻译成中文!
附录

图01: ESD加密过程及恢复过程示意图。
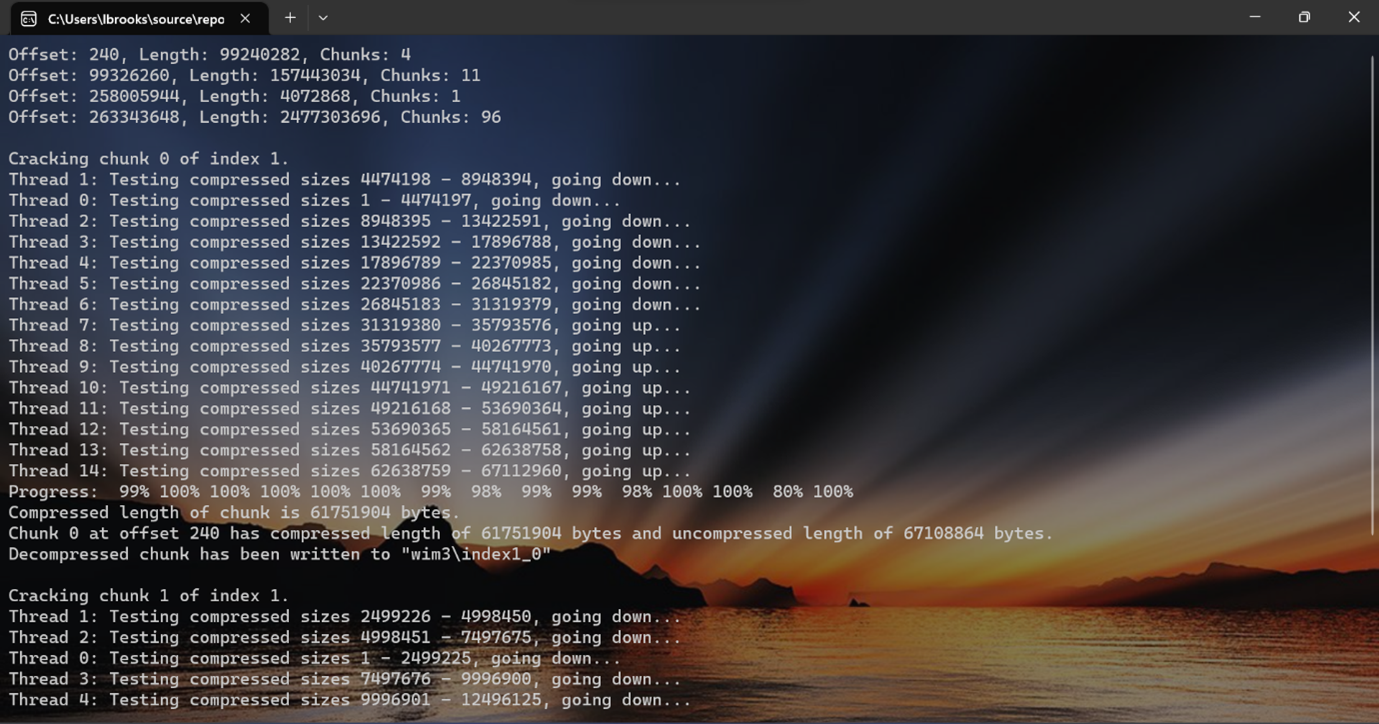
图02: 试验中的ESD暴力解压工具(所用文件为Windows 10 build 10134 x64 ESD)。
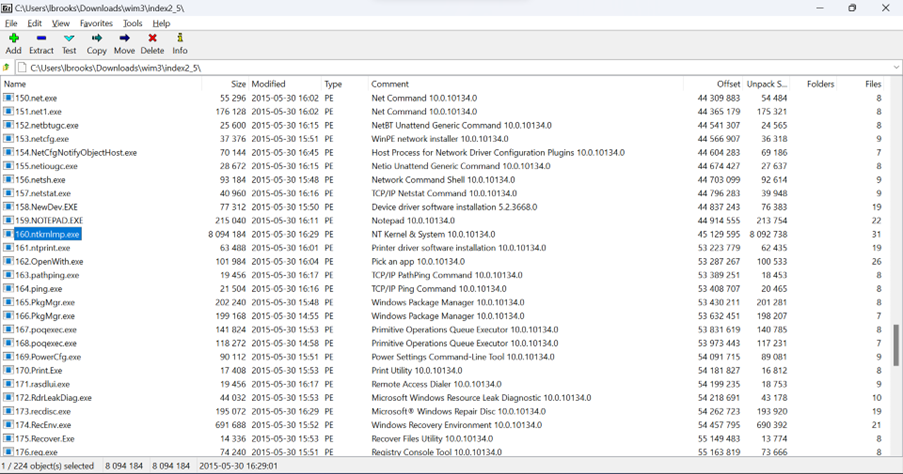
图03: 在7-Zip的#模式下打开的数据区块。
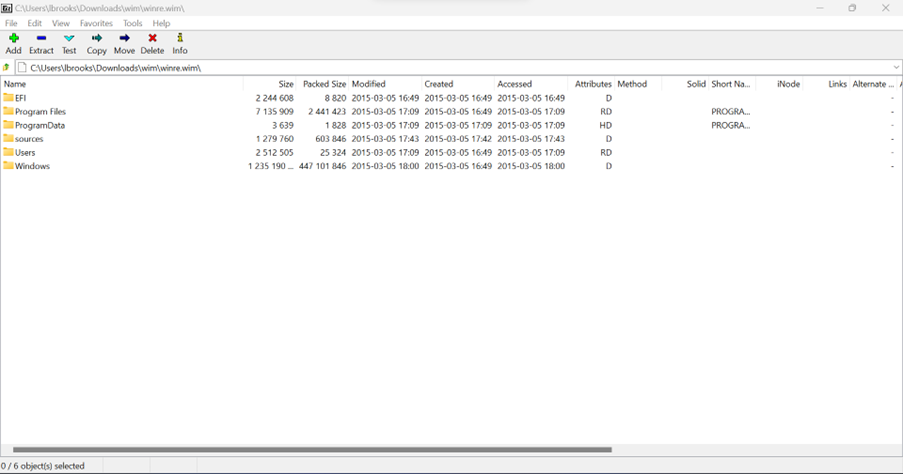
图04: 恢复得到的Windows 10 build 10034 (x86) WinRE镜像文件。
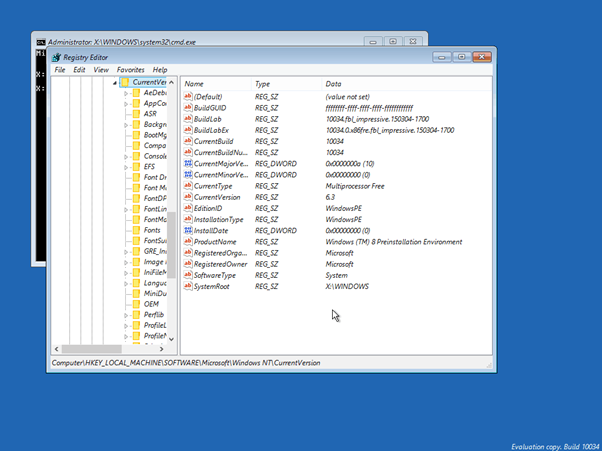
图05: 运行Windows 10 build 10034 (x86) WinRE(感谢BlueRain的截图)。
Decompression of Encrypted ESDs
You heard it right, we can now extract stuff out of encrypted ESDs. Don't get too excited yet - this writeup is mainly intended for people with some level of experience with the Windows Imaging format (WIM) and the undocumented Electronic Software Download (ESD) image format!
To protect Windows images from being installed by unauthorised users, some ESD files are encrypted. Those ESDs are AES-encrypted, with the RSA-encrypted AES key stored in the XML data. To decrypt an ESD, the private RSA key from the Windows Update server will be used to decrypt the encrypted AES key, then the AES key will be used to decrypt the encrypted sections of the ESD. Without the private RSA key, an encrypted ESD is just a collection of random bytes (or maybe not...).
Encrypted Sections
Since not all processors have built-in AES support, Microsoft chose to only encrypt the sections required for data extraction. The chosen sections are the metadata resources, the lookup table and the chunk tables.
With the metadata resources, lookup table and chunk table unencrypted, you have a full ESD image:
With the metadata resources encrypted and the rest unencrypted, you’re left with a bunch of files without directory structure and names (they can be identified by their SHA-1 hash):
With the metadata resources and the lookup table encrypted, you’re left with a huge blob of data that has all the files in the ESD concatenated together (you won’t know where they start and where they end, it’s just the raw bytes concatenated):
And with the chunk tables encrypted, data extraction becomes impossible so you’re left with… well, nothing, not even the length of the uncompressed data:
Cracking The Chunk Tables
If we can somehow obtain the chunk tables, then we can at least get a huge file which has all the files in the ESD concatenated. It probably wouldn’t be too simple to reconstruct a Windows image out of it, but at least all files are in there and we can manually extract the files of interest (eg: winre.wim, ntoskrnl.exe, explorer.exe and co.).
To crack the encrypted chunk tables, we need to first understand what a chunk table is.
ESDs are solid LZMS compressed archives with chunk size of 64 MiB, and LZMS extraction requires the knowledge of:
- The starting offset of the compressed data.
- The length of the compressed data.
- The length of the uncompressed data.
Chunk tables are for storing these, with one chunk table per solid blob (each solid blob means a new index in the image). A chunk table is defined as follows:
typedef struct _WIM_CHUNKED_REGION_HEADER
{
    ULARGE_INTEGER ullUncompressedSize;
    DWORD dwWindowSize;
    DWORD dwCompressionType;
    DWORD dwCompressedSizes[];
} WIM_CHUNKED_REGION_HEADER;
- The first field, ullUncompressedSize is a 64-bit integer for storing the uncompressed size of the solid blob. With this value, we can calculate numChunks = ⌈ullUncompressedSize ÷ 64 MiB⌉ and sizeof(tailChunkUncompressed) = ullUncompressedSize – (numChunks – 1) × 64 MiB. The uncompressed size of all none-tail chunks can be assumed to be dwWindowSize (64 MiB).
- The next field, dwWindowSize, is the chunk size. For ESD data, it’s always 64 MiB.
- The third field, dwCompressionType is the compression type and for ESDs, it’s always LZMS (3).
- The last field is an array for storing compressed sizes of the chunks. You can use these sizes to work out the offset of the next compressed chunk and the next and so on.
So, for each solid blob, after parsing its chunk table we should have:
- Number of chunks in the solid blob.
- For each chunk, its location, compressed size and uncompressed size.
Since the chunk tables are encrypted, we’re not getting any of that, so now the question is, how do we get all of that information without the chunk table? In other words, how can we reconstruct a chunk table based on the compressed data alone?
The first thing we have to do is to figure out the number of chunks in the solid blob. In ESDs, there’s a solid blob for each index (that has new files, which should always be the case) and each solid blob has a chunk table, and there’s a metadata resource file for each index. We know both the chunk tables and metadata resources are encrypted for each index, so let’s take a look at the following XML:
The lengths circled in red are the lengths of the chunk tables, they’re quite easy to spot since chunk tables are significantly smaller than metadata resources and lookup tables (the other lengths).
The number of chunks in a solid blob can be calculated by (sizeof(chunkTable) – 16) ÷ 4. Let’s take the first one as an example, it has length of 28, so the number of chunks in the first index is (28 – 16) ÷ 4 = 3, there are 3 chunks in the first index.
Next, we need to figure out the location of the compressed chunks. The location of the first chunk is always the location of the chunk table plus the size of the chunk table, so for index 1, it’s 208 + 28 = 236.
Now what we want to find is the uncompressed and compressed sizes of the first chunk, then we can decompress it to recover data. Since the first chunk is a non-tail chunk (there are 3 chunks, the first 2 are non-tail and the third one is tail), we know its uncompressed size is 64 MiB. So, the only thing we’re missing is the compressed size, and that will have to be brute forced.
Here is the pseudocode for brute forcing the compressed sizes of non-tail chunks:
Function UncompressLZMS(Input, InputLen, Output, OutputLen) Returns Length Throws Exception
Function CompressLZMS(Input, InputLen, Output, OutputCap) Returns Length Throws Exception

Function GetCompressedSize(CompressedBuffer[64 MiB]) Returns Length
    SizeToTry = 1
    UncompressedBuffer = Buffer(64 MiB)
    RecompressedBuffer = Buffer(64 MiB)
    While SizeToTry < 64 MiB:
        Try:
            ULen = UncompressLZMS(CompressedBuffer, SizeToTry, UncompressedBuffer, 64 MiB)
            If ULen != 64 MiB:
                Throw BAD_ULEN
            CLen = CompressLZMS(UncompressedBuffer, 64 MiB, RecompressedBuffer, 64 MiB)
            If CLen != SizeToTry:
                Throw BAD_CLEN
            If RecompressedBuffer != CompressedBuffer
                Throw BUFF_MISMATCH
            Return SizeToTry
        Catch:
            SizeToTry = SizeToTry + 1
    Return 64 MiB // Chunk is uncompressed (can happen in ESDs).
Once the compressed size of the first chunk has been brute forced, we can decompress it. Now to work out the location of the second chunk, we simply add that length to the location of the first chunk, then we can use the same function to brute force the compressed size of the second chunk. Once that is done, we can decompress the second chunk and work out the location of the third chunk. Since there are 3 chunks in the first index, the third chunk is the tail chunk. Up to this point, we know the location of the third chunk, but we’re missing both its compressed size and uncompressed size (since it’s the last chunk, the uncompressed size is not guaranteed to be 64 MiB). Fortunately, we only need to brute force the uncompressed size as the compressed size can be calculated. Let’s revisit the XML:
The offsets circled in green are the offsets of the encrypted metadata resources, and since metadata resources come right after the compressed data, we can use the offset of the metadata resource minus the offset of the tail chunk to work out the compressed size of the tail chunk. So now we have both the offset and the compressed size, we only need to brute force the uncompressed size. Here is the pseudocode:
Function UncompressLZMS(Input, InputLen, Output, OutputLen) Returns Length Throws Exception
Function CompressLZMS(Input, InputLen, Output, OutputCap) Returns Length Throws Exception

Function GetUncompressedSize(CompressedBuffer[CompressedSize]) Returns Length
    SizeToTry = 1
    UncompressedBuffer = Buffer(64 MiB)
    RecompressedBuffer = Buffer(64 MiB)
    While SizeToTry <= 64 MiB:
        Try:
            If SizeToTry = CompressedSize:
                Throw SAME_LEN_NOT_ALLOWED
            ULen = UncompressLZMS(CompressedBuffer, CompressedSize, UncompressedBuffer, SizeToTry)
            If ULen != SizeToTry:
                Throw BAD_ULEN
            CLen = CompressLZMS(UncompressedBuffer, SizeToTry, RecompressedBuffer, 64 MiB)
            If CLen != CompressedSize:
                Throw BAD_CLEN
            If RecompressedBuffer != CompressedBuffer
                Throw BUFF_MISMATCH
            Return SizeToTry
        Catch:
            SizeToTry = SizeToTry + 1
    Return CompressedSize // Chunk is uncompressed (can happen in ESDs).
With the location, compressed size and uncompressed size of the tail chunk, we can decompress it. Since we have all non-tail chunks and the tail chunk decompressed, we can concatenate them together to form one blob of data and that is the uncompressed solid blob. You can then use the length of the uncompressed solid blob and the sizes of the compressed chunks to reconstruct the chunk table, which you’ll probably want to save somewhere so that you don’t have to do all the brute forcing again the next time you want to extract something.
Partial Recovery of The Lookup Table
Previous lookup tables for ESDs with multiple indexes can be recovered. ESDs with multiple indexes are generally generated by appending new indexes to the initial index, and whenever a new index is appended, the lookup table and XML data will have to be modified. Instead of modifying the existing lookup table and XML directly, DISM/WImgAPI appends a new lookup table and XML to the end of the ESD and modifies the pointers in the header to point to the newly added lookup table and XML. Since the old lookup table(s) and XML(s) are not longer referenced by the header, they cannot be encrypted. This leaves us an opportunity to recover those and use them to recover the individual files in the solid blobs of all indexes except for the last one. For the last time, let’s take a look at the XML:
Any well-formed ESD should have a lookup table and an XML directly after each metadata resource (ranges circled in green), so we can use the offset of the metadata resource plus its length to work out the offset of the lookup table and XML. The length of the lookup able and XML can be worked out by subtracting its offset from the offset of the next chunk table (circled in red). Take the first index as an example, the unreferenced lookup table starts at offset 63501870 + 37704 = 63539574, and has length 63585588 – 63539574 = 46014. If you copy 46014 bytes at offset 63539574, you’ll have the lookup table and XML of the first index concatenated together. Since the lookup table is binary and the XML is plaintext, they can be easily split apart (though the XML is kind of useless).
The last recoverable lookup table can be used to extract all individual files from all indexes except for the last index, and each lookup table can be compared to the previous lookup table to work out what was added in that particular index (look for new entries and changes in reference counts).
Conclusion
While ESD encryption is very effective at preventing unauthorised installations of Windows builds, it does not protect the data against extraction. With sufficient time and effort, most of the existing encrypted ESDs can be extracted and have all files in them recovered.
ESD Extraction Tool
Included Tools
- RawUncomp - tool for recovering data from truncated LZX WIMs.
- LibMSCompress - wrapper library around private wimgapi.dll functions.
- MSComp - compression/decompression tool with XPRESS, LZX and LZMS support.
- ESDCrack - semi-automated ESD cracking tool.
ESD Cracking
ESDCrack currently does not support the decompression of tail chunks (the code is there, but I've disabled it) as it would take years to actually brute force a tail chunk. What you can do is you can crack the tail chunks manually using mode 3 of the included MSCompress utility, where you will get to adjust the parameters to significantly reduce the number of combinations to try. Feel free to modify/improve these tools and if you have better ways/algorithms, please let us know!
P.S. Don't laugh at my code, I know it's bad. I am not a software developer and I have never taken a single programming class before, so what do you expect lol.
Special Thanks
Special thanks to BlueRain for coming up with the idea that data in encrypted ESDs can be extracted and for translating this article to Chinese!
Appendix

Fig01: Visualisation of ESD encryption and recovery.

Fig02: Experimental ESD brute force extraction tool in action (Windows 10 build 10134 x64 ESD).

Fig03: Extracted chunk opened in 7-Zip’s # parse mode.

Fig04: Recovered Windows 10 build 10034 (x86) WinRE WIM image.

Fig05: Windows 10 build 10034 (x86) WinRE in action (screenshot by BlueRain).